Shopify is one of the most popular eCommerce platforms on the market today. And for good reason! It’s user-friendly, has tons of features and integrations, and is relatively affordable.
In this quick and easy Shopify tutorial, we’ll show you how to get started with Shopify and start selling online. We’ll cover everything from signing up for a Shopify account to adding products and processing orders. By the end of this tutorial, you’ll be well on your way to setting up a successful online store!
1. Sign Up for Shopify’s Free 14-Day Trial
The first step is to sign up for a Shopify account. You can do this by going to shopify.com and clicking on the “Sign Up” button.
Head on over to shopify.com/signup and input your email address, a secure password, and the name of your store before you can start learning how to use this awesome e-commerce platform!
You can change the name of your store at any time, so it’s okay if you don’t know what to call it just yet. You’ll figure out something fun in no time!
Shopify has a few questions for us before we get started with customization and optimization — answer these as best possible (you never have an excuse not to do this).
You should also verify your email address before you start using Shopify to keep track of any activity that occurs on the account.
Well done, you! You’ve just set up your new online store. This is so exciting 🙂
2. Choose Your Shopify Plan
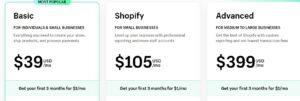
After you create your account, you’ll be prompted to choose a Shopify plan. For most people, the Basic Shopify plan will be more than enough to get started.
If you’re not sure which plan is right for you, you can always start with the 14-day free trial and upgrade later.
Basic Shopify: Perfect for small businesses just getting started with ecommerce. Includes all the essential features you need to start selling online.
Shopify: Ideal for growing businesses. Includes more advanced features and integrations to help you scale your business.
Advanced Shopify: Best for large businesses with high-volume
Shopify’s dashboard is a four-point checklist to make sure you have everything needed for your store.
Check out this quick and easy way to get what you need. When we click on one of these options, Shopify will show us more tools for managing your business!
You’ll also see “Settings” at the bottom of the left sidebar. Here you can update many of the main functions of your account, such as your store name, payment details, and notifications.
3.Pick a Theme for Your Shopify Store

Now it’s time to start customizing your store! The first thing you’ll need to do is choose a theme.
Shopify has a wide variety of both free and paid themes, so you’re sure to find one that fits your style and brand.
To get started, click “Online Store” in the sidebar and then click “Themes.”
You can start customizing your own theme or scroll down the page to choose one of ours! We have 3 options:
explore free themes
Browse our Shopify Theme Store
Upload any purchased from a third-party marketplace like Themeforest
it’s easy to change your theme once you’ve installed one. Plus, if something suits a different design style or has special functionality that isn’t already present in the pre-installed options then hire an expert for help customizing it just how YOU want!
The menu on the left side of your site lets you customize different areas with drag-and-drop modules. And there’s a dropdown menu at top which allows for customization options when setting up new pages or making changes to existing ones in various ways such as colors, fonts etc.. accessed through Theme settings located under “Support” button below Web Address bar where it says “Get Help”.
4.Add Sales Channels
Now that your store is all set up, it’s time to start selling! To do this, you’ll need to add a sales channel.
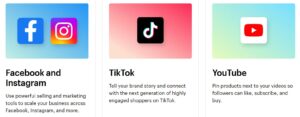
Shopify has a few different options for selling online:
– You can sell through your own website
– Sell on social media platforms like Facebook and Instagram
– Use Shopify’s POS system to sell in person
To add a sales channel, click “Online Store” in the sidebar and then click “Sales Channels.” From here, you can add the channels that you want to use.
For most people, the best option will be to sell through their own website. To do this, simply click “Add Channel” and then select “Website.”
You can also add other channels, like social media or POS, later on.
5. Add Products to Your Shopify Store

once you have your store set up the way you want it, it’s time to start adding products. This is one of the most exciting parts of starting a Shopify store!
To add a product, simply click on the “Products” tab in your Shopify dashboard and then click “Add product.”
From there, you’ll be able to enter all the relevant information about your product, including its name, description, price, and more.
You can also add photos and videos to really make your products pop!
If you want to start selling products online, Shopify is a great option. There’s an app called DSers that will help find product ideas for your store and even search through listings of already available items–all from within the platform!
If you’re selling digital products, make sure to uncheck “This is a physical product” to disable the shipping options.
You can also set up collections to group products — for example, you could have different groups for men’s clothing and women’s clothing.
Once you’re done, don’t forget to click “Save product.”
6.Set Up Payments
The next step is to set up payments for your Shopify store. This is how you’ll actually get paid for the products that you sell!
Shopify offers a few different options for payments, including credit cards, PayPal, and Apple Pay.
To set up payments, click on “Settings” in the sidebar and then click “Payments.” From here, you can choose which payment options you want to offer.
If you’re just getting started, we recommend using Shopify Payments. This is the easiest way to get set up and it’s what we use for our own store.
To use Shopify Payments, simply click on “Activate” next to it. You’ll then be prompted to enter some information about your business, including your address and phone number.
Once you’re done, scroll down and click “Save.”
Configure Shipping Rates
Configure shipping rates
The next step is to configure shipping rates for your Shopify store. This will let your customers know how much they’ll need to pay for shipping when they order products from your store.
To set up shipping rates, click on “Settings” in the sidebar and then click “Shipping.” From here, you can add different shipping options and rates.
For most people, the best option will be to use Shopify’s calculated shipping rates. This lets Shopify automatically calculate shipping rates based on the products that a customer has in their cart.
To use this feature, simply click on “Calculated shipping rates” and then select the countries that you want to offer shipping to.
Once you’re done, scroll down and click “Save.”
And that’s it! You now know how to set up and use Shopify. With a few clicks of the button, you can start selling products online and reach a whole new group of customers.
If you have any questions, be sure to check out Shopify’s support documentation. They have tons of information on everything from setting up your store to adding products and more.
7.Add a Domain to Your Shopify Store

The next step is to add a domain to your Shopify store. This is the address that people will use to visit your store.
If you don’t have a domain yet, you can buy one directly from Shopify. Simply click on “Domains” in the sidebar and then click “Buy new domain.”
From here, you can search for the domain that you want and then add it to your cart.
If you already have a domain, you can add it to your Shopify store by clicking on “Domains” in the sidebar and then clicking “Add existing domain.”
From here, you’ll need to enter your domain name and then click “Verify.” Once your domain is verified, you’ll be able to set it as the primary domain for your store.
And that’s it! You now know how to add a domain to your Shopify store. This is an important step in making sure that people can find your store online.
Don’t forget to check out Shopify’s support documentation for more information on adding and managing domains.
The next step is to set up your navigation. This is the menu that people will use to navigate around your store.
To set up your navigation, click on “navigation” in the sidebar and then click “Main menu.” From here, you can add, edit, and delete menu items.
To add a new menu item, simply click on “Add menu item” and then enter the name of the page that you want to link to.
If you want to link to an existing Shopify page, such as your contact page or your blog, you can search for it by name.
Once you’re done, scroll down and click “Save.”
And that’s it! You now know how to set up your navigation. This is a vital step in making sure that people can find their way around your store.
9.Get Your Site Ready to Go Live
Now that you’ve added products and set up your navigation, it’s time to get your site ready to go live.
The first step is to add a favicon. This is the small icon that appears in the browser tab when people visit your store.
To add a favicon, click on “Settings” in the sidebar and then click “General.” From here, scroll down to the “Store identity” section and click “Upload image.”
Choose the favicon that you want to use and then click “Save.”
The next step is to add a privacy policy. This is a document that outlines how you collect, use, and protect your customers’ data.
To add a privacy policy, click on “Settings” in the sidebar and then click “Legal.” From here, scroll down to the “Privacy policy” section and click “Create new privacy policy.”
Enter your privacy policy information and then click “Save.”
The last step is to add terms of service. This is a document that outlines the rules and regulations for using your store.
To add a term of service, click on “Settings” in the sidebar and then click “Legal.” From here, scroll down to the “Terms of Service” section and click “Create new terms of service.”
Enter your terms of service information and then click “Save.”
And that’s it! You’re now ready to go live with your Shopify store.
Launch Your Shopify Store
The last step is to launch your Shopify store. This is the moment when your store goes live and becomes accessible to the world.
To launch your store, click on “Settings” in the sidebar and then scroll down to the bottom of the page. From here, click on the “Launch your store” button.
Enter your password to confirm that you want to launch your store and then click “Launch.”
And that’s it! You’ve now launched your Shopify store. Congratulations!
10.Promote Your Shopify Store
The final step is to promote your Shopify store so that people can find it online. You can do this by creating a blog, sharing your store on social media, and running ads.
By following these steps, you’ll be well on your way to setting up a successful Shopify store!
11. Customize Your Site’s Functionality with Shopify Apps

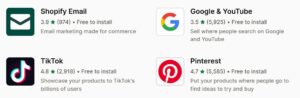
Now that you’ve set up your Shopify store, it’s time to start customizing its functionality with apps.Shopify has a huge app store with over 2,000 apps to choose from. These apps can help you do everything from marketing your store to accepting payments and shipping orders. To find apps for your store , click on “Apps” in the sidebar. From here, you can browse through the most popular apps, search for specific apps, or explore app categories. Once you’ve found an app that you want to use, simply click on the “Add app” button. You’ll be taken to the app’s page where you can learn more about it and install it for your store.
Now that you know how to use apps to customize your Shopify store, it’s time to start exploring the app store and finding the perfect apps for your business!
12.How to Get Help with Shopify
If you ever need help with Shopify , there are a few different ways to get it.
The first way is to use the Shopify Help Center . This is a resource center that contains articles, tutorials, and FAQs about using Shopify .
If you can’t find the answer to your question in the Help Center , you can always contact Shopify support . You can do this by clicking on the “Contact” link in the footer of the Help Center . From here, you can submit a support ticket and one of Shopify’s support representatives will help you out.
The last way to get help with Shopify is to join the Shopify forums. This is an online community where users can ask questions, share tips, and help each other out. To access the forums, simply click on the “Forums” link in the footer of the Help Center.
Now that you know all about Shopify, it’s time to get started! The first step is to sign up HERE
Additional interesting articles: